5 Steps to Shallot Planting Success
- Choose a sunny spot to plant your shallots. In New Zealand shallot planting time is February-December, depending on region.
- Prepare your soil with organic matter like compost and sheep pellets.
- Add a layer of vegetable mix to plant into.
- Feed every four weeks during key growth periods.
- Keep the soil moist but not wet.
Follow our full guide below to a bumper crop of homegrown shallots.
This small and sweet onion variety is a must have for gourmet gardeners! Shallots are hardy, easy care crops which makes them perfect for beginners too. They have a more subtle flavour than brown onions and are widely used in all sorts of dishes.
Commonly planted from bulb rather than seed, the shape can vary from round and chubby to longer cone shapes depending on the type of shallot.
Choose a variety
Ambition: a small, round, sweet, crisp brown shallot.
Flowering shallot: an heirloom variety which produces a flower spike on top of each bulb.
French: a brown-skinned, purple-fleshed variety which is reliable and produces a good crop.
Frog's legs: a good cropping type with slightly purple flesh and brown skin.
Prepare
Shallots must be planted in full sun, in a well-cultivated soil. Prior to planting, add plenty of Tui Sheep Pellets and compost.
Add a layer of Tui Vegetable Mix to the area before planting. It contains the right blend of nutrients to provide your veges with the best possible start and sustained growth throughout the season.
Plant
Like garlic, shallots have traditionally been planted on the shortest day and harvested on the longest although they can be planted in autumn when the cooler weather arrives.
Shallots are often planted as bulbs which are quicker to crop than growing from seed. Shallot seedlings are rarely seen in garden centres but the bulbs are usually available in winter.
If you are sowing from seed its best to do it in spring and summer so you have good sized bulbs to plant out in autumn or winter. You can sow straight into the garden or in trays. Allow 5cm between each seedling when thinning or transplanting.
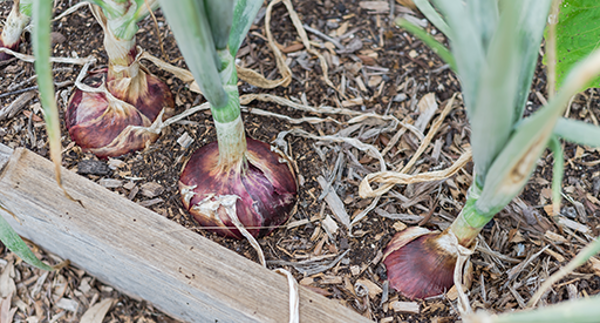
If you are using bulbs they should be planted on the surface of the soil, with the tip of the bulb poking slightly out of the ground. As the shallot grows you can begin to push some earth away from the bulb which will let the sun reach the bulb and help it grow.
Nourish
Keep the soil moist but not wet. Shallots are an easy care crop that rarely suffer from pests or disease.
Keep the area around the shallots weed-free. Feed with Tui Vegetable Food every four weeks during key growth periods, or use Tui NovaTec Premium fertiliser - it feeds for up to four months.
For supercharged feeding with quick visible results try Tui Vege & Herb Liquid Superfood.
Harvest and storage
- Harvest shallots when bulbs appear above the ground and the tops start to die back.
- Don't be tempted to pull the bulbs out by the leaves as these may snap off to leave the shallot in the ground. Instead, dig the bulbs up with a fork and leave to dry on the top of the ground for a week or so.
- Plait the leaves together and store the shallots somewhere dry and away from direct sunlight. In ideal conditions shallots will store for up to six months.
Save some of the best bulbs for planting next season!