KŪMARA QUICK START CHECKLIST
- Choose a sunny spot with plenty of space.
- Prepare the soil with Tui Sheep Pellets and Tui Compost.
- Plant into a quality mix: use Tui Vegetable Mix for a strong start.
- Feed regularly as your kūmara grow. Choose the fertiliser option that best suits how you want to garden, such as Tui Vegetable Food every 4-6 weeks.
- Lift foliage often to prevent new roots forming and redirect energy to tuber.
1
WHY CHOOSE KŪMARA
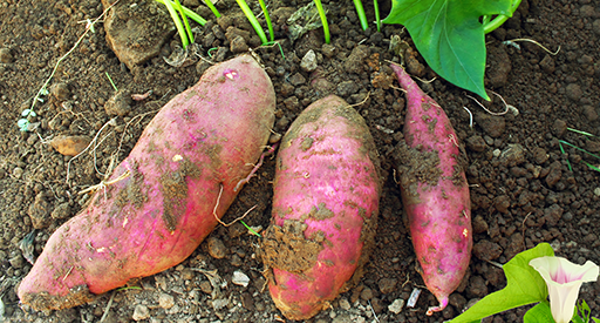
Also known as sweet potato, kūmara is a firm Kiwi favourite. High in fibre and providing essential nutrients including calcium and iron, it is a superfood of the garden. Kūmara is a root crop that grows underground in a similar way to potatoes.
Kūmara shoots are often referred to as slips or tupu/tipu. They’re available in garden centres in spring, usually around October, or you could try raising your own from sprouted kūmara. It’s best to start them indoors in winter as they need warmth to sprout.
To grow your own shoots:
- Cut a mature kūmara in half and place cut side down in water.
- Place on a sunny windowsill or in a hot water cupboard.
- Shoots will appear in 1–2 weeks.
- Once shoots are 10–15cm long, remove and place in water to root.
- Plant rooted cuttings in a J-shape to encourage horizontal root growth.
PREPARE THE SOIL
Kūmara is frost-tender and prefers a hot summer, making it a challenge in cooler areas. A hard pan underneath helps prevent tubers from burying themselves too deeply. Some home gardeners dig a sheet of corrugated iron down into the pit or soil, so that the kūmara do not grow downwards, but go horizontally. The deeper they go, the less kūmara on the plants.
- Kūmara need plenty of room to grow, as they produce vine like green growth.
- Ensure the area has good drainage, full sun and room for vines to spread.
- Prepare the area well in advance of planting by mixing Tui Sheep Pellets and Tui Compost into your existing soil, cultivating to about 30cm deep.
GET PLANTING
Plant kūmara shoots once the risk of frost has passed.
- Add a layer of Tui Vegetable Mix to your prepared area; developed to give vege crops a strong start and includes a blend of fertilisers, sheep pellets, blood & bone and dolomite lime to support initial plant growth.
- Kūmara are planted in the garden at 30cm spacings and offset or staggered (in a triangle pattern) so there is space around each plant.
- Dig a hole in prepared soil.
- Position the shoot in a J-shape in the centre so that the plant grows horizontally.
- Fill with Tui Vegetable Mix.
- Water well after planting.
You can grow kūmara in large planters or tubs too, they’re great for more intensive planting. Pop 10–20 slips into a 50–60 cm pot filled with Tui Vegetable Mix, and keep them well watered every couple of days.
FEED AND NOURISH
- Kūmara use nutrients from the soil as they grow, so replenishing nutrients regularly ensures your plants grow to their full potential.
- Water regularly, every 2-3 days, to help the slips establish strong roots. Continue watering during dry spells or whenever the plants show signs of wilting. Adding mulch around each plant also helps retain soil moisture.
- Choose from a variety of different Tui fertiliser options, depending on what suits you.
- Tui Vegetable Food - a rich formulation of fertilisers including dolomite, blood and bone and sheep manure. It can be applied every four weeks and is not recommended for pots and containers.
- Tui Vege & Herb Liquid Superfood - is perfect for quick results in pots as plants are able to absorb the nutrients immediately. Suitable for kūmara growing in pots and containers or in the garden. For best results feed weekly.
- Tui Seaweed & Fish fertiliser - can be applied every two week and is great for garden beds, pots and containers to boost growth and resilience.
- Kūmara vines spread out along the ground and can send down roots wherever the vine touches the soil. If this happens, the plant starts putting energy into making new root systems instead of focusing on producing a good-sized tuber (kūmara) at the original plant. Lift foliage often to prevent new roots forming and redirect energy to tubers.
- Conserve soil moisture over the summer months with Tui Pea Straw. It’s important not to let kūmara beds dry out as it can really slow down tuber growth.
- Protect from slugs and snails by applying Tui Quash every few weeks.
FREQUENTLY ASKED QUESTIONS
When should I plant kūmara in New Zealand?
- Kūmara is a versatile vege and the best time to plant it is in spring once the risk of frost has passed.
- Check at your local garden centre then for tubers around October, or propagate your own slips.
How do I know when my kūmara are ready to harvest?
- Kūmara take approximately 120-150 days from planting to harvest.
- Harvest once the leaves start to yellow, and before the first frost (usually in autumn if planted in spring).
- Cut back the foliage and then lift kumara carefully using a fork.
- Leave them on the bed to cure in the sun for a couple of days.
- Cover them at night (with a sack or newspaper), then store in a cool dry place.
Can I grow kūmara in a container?
- Kūmara can be grown in large grow bags or pots around 30-60cm in diameter - containers with handles are great.
- Fill with a quality potting mix like Tui Vegetable Mix - it's free draining, contains dolomite lime, sheep pellets, blood and bone and has an organic bark base.
- They can be planted more intensely in containers, spaced at 15-20cm and offset on a diagonal.
- You may be able to fit around 20-25 slips in a large grow bag or pot.
- Feed with Tui Seaweed & Fish fertiliser every 2-4 weeks and make sure your kūmara are watered throughout the growing season as they will dry out quickly when planted close together.
Discover more advice and inspiration for growing your own veges at the Vege Hub >